
SPOILER ALERT!
London home builders: washroom ideal choice.
http://bathtubrepair.s3-website.us-west-2.amazonaws.com/Bathtub/Bathtub-Repair-in-Titusville.html
http://bathtubrepair.s3-website.us-west-2.amazonaws.com/Bathtub/Bathtub-Repair-in-Cleveland-Heights.html
What makes an excellent bathroom.
How to select the best restroom collection from all the variety we carry the marketplace? What is it essential to consider when selecting a bath tub or necessary equipment? Well chosen as well as efficiently placed bathtub and also equipment will make them comfy and easy to make use of.
To start at the right time.
It is required to select required restroom devices (consisting of a bathtub) before the brand-new shower room installation works start. Having decided on the arrangement of restroom equipment, it is necessary to exercise water-piping as well as drainage system, in case new format differs from the existing one.
A selection as well as a number of pipes and also fitment needed (adapters, installations, branch boxes, etc) shall be picked according to the setup strategy. In situation the existing layout is preserved, it is needed to decide whether old shower room pipelines require to be changed. New shower room units installation begins prior to the start of finishing works.
Where to start with when choosing a bath tub.
When selecting a tub, it is necessary to adhering to criteria. A tub needs to be of comfortable size and type, to fit to the dimension as well as inside of the brand-new renovated bathroom. The bathtub must be strong and immune to mechanical problems, immune to solvent activity of water (wooden tubs or Ofuro, likewise referred to as furo a typical Japanese bath, generally related to a steep-sided wood bath tub). A new restroom installation system will correspond to the existing supply of water system. In case drainage devices (waste catches) are not consisted of in a set, it is essential to purchase a bath tub as well as a waste trap at the same time to offer compatibility of constructions. All of the bath tubs are supplied with the openings for overflow which are structurally gotten in touch with a bath trap.
It is recommended to select mixers when purchasing a bathroom too. It is necessary to understand that
setting up a brand-new bath tub, it is needed to enable a comfortable space near the new bath tub to make your restroom safe to make use of. Additionally it is better to select a model with anti-slip coating on a base which is provided by including quartz granulated material or rubber beads. For convenience of utilizing, fashionable bath tubs are typically offered with various types of elbow-rests, headrests, comfy chrome-plated or gilded manages, real estate for soap dishes, etc. Numerous suppliers generate bathrooms with the back-rests of structural type which comply with human body curves. Depending upon a customer's predilections and basic washroom interior decoration, it is feasible to pick a bathroom suite of virtually any color. Generally, most of offered commercial shower room collections are of white color. Much more polished colors are supplied to get. Timing of orders differs.
What does a price of a shower room suite depends on?
Production material (in raising cost: steel, cast-iron, acrylic), a dimension (bath tubs of common dimensions are more affordable), a type (rectangular tubs are less costly than angular and also designed ones, at various other equal summaries: making product, course, setup). Also the presence of extra practical details: headrests, elbow-rests, seats, takes care of, shelves, etc. A class as well as style of a product specifies the price array as well: "sensible", "fabulous", "incredibly de luxe". For instance the "incredibly de luxe" rectangle-shaped cast-iron bath tub is more expensive than the "functional" shaped acrylic bathtub).
What is not suggested.
Purchasing a tub in instance there are also insignificant chips or fractures on its surface area. Choosing a bathroom suite vendor it is far better to buy a washroom collection of the recognized shower room manufacturer, which assures quality of product and insurance coverage: thoroughness of surface area treatment prior to enamel application (no spaces, no handles, nor crumbs or sand are enabled under enamel), top quality of the bath tub enamel and also its application. Identical colors of different shower room collection vendors can have different tones, therefore, it is far better to purchase a complete collection of restroom tools of one producer.

SPOILER ALERT!
An Overview of Handicapped Tub Options
http://bathtubrepair.s3-website.us-west-2.amazonaws.com/Bathtub/Bathtub-Repair-in-Margate.html
http://bathtubrepair.s3-website.us-west-2.amazonaws.com/Bathtub/Bathtub-Repair-in-Dover.html
There are numerous tubs on the market today specifically designed for handicapped bathers. Numerous have special functions that permit those with unique needs to make use of the bathtubs without aid. Investing in one of these handicapped bathtubs can allow your loved one to restore their independence as well as self-respect.
One of the much more popular types of tubs is the "walk-in" bathtub. This tub is usually designed to suit concerning the exact same area as a typical bath tub, however allows the customer with wheelchair concerns to enter the tub with a gate-like door. Allowing the customer to enter the tub minimizes injuries caused by climbing over the wall surface of a conventional tub. Furthermore, the stroll in bathtub is made with a seat as well as handheld shower go to practical and secure usage. The individual does not need to lower themselves to the floor, just onto a seat. After securing the door with a handle or switch, the bather can unwind conveniently and also safely as well as capitalize on optional features like hydrotherapy, temperature control and also self-drying features.
Those with more severe movement limitations and also wheelchair customers may value an additional prominent handicapped tub version. On these designs, the doors open exterior to make them also easier to make use of, as well as the "sit and also pivot" design allows wheelchair customers to transfer themselves to the tub with ease. Popular features can be set up, as well as these units likewise supply temperature level control, optional whirlpool or hydrotherapy functions as well as safety and security bars.
There are business that will transform your existing tub for handicapped usage as well. These conversions usually involve cutting a door right into an existing bathtub or reducing the outer wall surface as well as mounting steps. The evaluations of these conversions have actually been combined, and if safety and security is your key concern, a tub made for handicapped usage is probably your best choice.
Offering your disabled loved one with a bathtub made for their use can aid them live a more independent life, while ensuring their safety and security as well as dignity.

SPOILER ALERT!
Truths concerning Tub Surround as well as What it Can Do For You
http://bathtubrepair.s3-website.us-west-2.amazonaws.com/Bathtub/Bathtub-Repair-in-Leesburg.html
http://bathtubrepair.s3-website.us-west-2.amazonaws.com/Bathtub/Bathtub-Repair-in-San-Bruno.html
Concealed away behind-the-scenes of the bathroom is an exceptional technology that the majority of people will never discover unless they meticulously evaluate its sides.
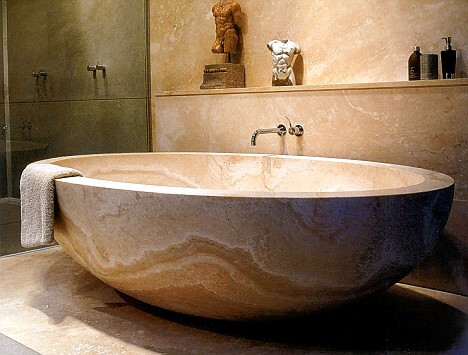
Tub. Suitable for luxurious bathrooms as well as showers.
Who can ever believe that underneath these beautiful productions is an inventive use of what would otherwise have been simply an additional attribute of a common kind inside your home.
Entering into the information of the tub, one gets the wonderful impression of making an entirely unforeseen, felicitous discovery. That beneath the remarkable and also stress-free bathrooms are practical devices that function as a barricade against water infiltration-- tub surround. Without it, you can have been stomping your escape of the washroom as a result of water loss.
The Hidden Principle
What lots of people do not know is that bathtub surround is an innovative tool to seal or lock-in water within the boundaries of the tub. These tub surrounds can be utilized anywhere yet they simply works well with tubs.
These type of borders generally been available in sets, where the handbook or user's manual is consisted of. However, this manual is ideal checked out while inside the store since there are some guidelines on purchasing particular materials that will be required when you are currently mounting the bath tub border.
Nonetheless, just as good as it might sound, many people are still not knowledgeable about the benefits that they can derive from tub borders. Hence, right here is a checklist of a few of its benefits to make sure that they will certainly recognize that the next time they see bathtub surrounds, they know that they should purchase one for immediate scenario or certain type of tub disaster.
1. Comfort
Bathtub surrounds are not built just for the sake of constructing it. These kinds of surrounds are particularly made to provide ease for the bath tub users.
With bathtub surrounds, individuals can anticipate simpler, more convenient method of retaining water while taking a dip.
2. Maximum water conservation
One of the best things about bath tub borders is that it promotes water preservation. This is because with these points existing in your bath tub, you can be guaranteed that what you obtain is full distribution of the amount of water that you have simply put inside your tub. This implies that as you progress with your bath, no amount of water is wasted that is normally produced by leakage or infiltration within the wall surfaces of the tub.
3. Trustworthy
Bath tub surrounds can actually offer you several years of leakage-free soaking as well as showering. With these devices, you can be ensured of a hardwearing, stain-defiant, as well as convenient tub.
4. Good Impressions
Old, grimy tubs are absolute disgusts. They do not simply make your shower room filthy-looking yet they can also promote water leak while taking a dip.
Hence, via using tub surround, you can easily renovate your bath tub, therefore, creating a fresher and also modernized look.
Best of all, bath tub borders somewhat hide the blemishes produced by the deterioration of your old tub. It covers any kind of cracks or breaks within the walls of your tub, which can as a result customize the general appearance of your tub as well as your bathroom.
Indeed, tub surrounds can provide lots of uses. It goes a lengthy means from that smooth tool to a much more convenient device that does not just address typical bathtub issues but can likewise customize and also boost the total look of your bathtub in addition to your restroom.
http://bathtubrepair.s3-website.us-west-2.amazonaws.com/Bathtub/Bathtub-Repair-in-San-Bruno.html
Concealed away behind-the-scenes of the bathroom is an exceptional technology that the majority of people will never discover unless they meticulously evaluate its sides.
Tub. Suitable for luxurious bathrooms as well as showers.
Who can ever believe that underneath these beautiful productions is an inventive use of what would otherwise have been simply an additional attribute of a common kind inside your home.
Entering into the information of the tub, one gets the wonderful impression of making an entirely unforeseen, felicitous discovery. That beneath the remarkable and also stress-free bathrooms are practical devices that function as a barricade against water infiltration-- tub surround. Without it, you can have been stomping your escape of the washroom as a result of water loss.
The Hidden Principle
What lots of people do not know is that bathtub surround is an innovative tool to seal or lock-in water within the boundaries of the tub. These tub surrounds can be utilized anywhere yet they simply works well with tubs.
These type of borders generally been available in sets, where the handbook or user's manual is consisted of. However, this manual is ideal checked out while inside the store since there are some guidelines on purchasing particular materials that will be required when you are currently mounting the bath tub border.
Nonetheless, just as good as it might sound, many people are still not knowledgeable about the benefits that they can derive from tub borders. Hence, right here is a checklist of a few of its benefits to make sure that they will certainly recognize that the next time they see bathtub surrounds, they know that they should purchase one for immediate scenario or certain type of tub disaster.
1. Comfort
Bathtub surrounds are not built just for the sake of constructing it. These kinds of surrounds are particularly made to provide ease for the bath tub users.
With bathtub surrounds, individuals can anticipate simpler, more convenient method of retaining water while taking a dip.
2. Maximum water conservation
One of the best things about bath tub borders is that it promotes water preservation. This is because with these points existing in your bath tub, you can be guaranteed that what you obtain is full distribution of the amount of water that you have simply put inside your tub. This implies that as you progress with your bath, no amount of water is wasted that is normally produced by leakage or infiltration within the wall surfaces of the tub.
3. Trustworthy
Bath tub surrounds can actually offer you several years of leakage-free soaking as well as showering. With these devices, you can be ensured of a hardwearing, stain-defiant, as well as convenient tub.
4. Good Impressions
Old, grimy tubs are absolute disgusts. They do not simply make your shower room filthy-looking yet they can also promote water leak while taking a dip.
Hence, via using tub surround, you can easily renovate your bath tub, therefore, creating a fresher and also modernized look.
Best of all, bath tub borders somewhat hide the blemishes produced by the deterioration of your old tub. It covers any kind of cracks or breaks within the walls of your tub, which can as a result customize the general appearance of your tub as well as your bathroom.
Indeed, tub surrounds can provide lots of uses. It goes a lengthy means from that smooth tool to a much more convenient device that does not just address typical bathtub issues but can likewise customize and also boost the total look of your bathtub in addition to your restroom.

Plumbing Basics-- Installing a Tub
http://bathtubrepair.s3-website.us-west-2.amazonaws.com/Bathtub/Bathtub-Repair-in-Edmonds.html
http://bathtubrepair.s3-website.us-west-2.amazonaws.com/Bathtub/Bathtub-Repair-in-Buckeye.html
http://bathtubrepair.s3-website.us-west-2.amazonaws.com/Bathtub/Bathtub-Repair-in-Barnstable-Town.html
Setting up a bathtub isn't exactly brain surgery, but it does need strong plumbing, woodworking, and occasionally, tiling abilities. Changing an old bathtub with a new one is additionally a reasonably challenging project. If the old tub is conveniently obtainable, the job can move speedily; if you need to open up a wall to eliminate the old bathtub as well as position the new bathtub, the job is much harder. In either case, the job is within a house handyman's skills, although you will require an assistant to leave the old bathtub and also embeded in the new one. Make sure you have certified yourself for the job and also are comfortable attempting it. As opposed to employing a contractor to take control of a halfway-completed job, it is much better to consider utilizing one before you begin. Possibilities are you may require a specialist plumbing technician to make tube connections.
This write-up will aid you set up a new bathtub in your shower room if you have actually already purchased a new bathtub as well as do not require to transform the plan of your previous water pipes.
Your tools as well as material list must comprise the following:
New Bath tub
Hammer
Pipe Wrenches
Prybar
Shatterproof glass
Degree
Pliers
Adjustable Wrench
Putty Knife
Screwdriver
Cold Chisel
Measuring tape
Pipe Caps
Getting ready for the Installation
First of all, the supporting frame provided with the bathroom should be fitted (if needed) according to the supplier's instructions.
Next, fit the faucets or mixer to the bath tub. When fitting the tap block, it is important to make sure that if the faucet comes with a plastic washer, it is fitted in between the bath as well as the taps. On a plastic bath, it is additionally sensible to fit a sustaining plate under the faucets system to prevent strain on the bathtub.
Fit the adaptable tap ports to the base of both taps utilizing 2 nuts and also olives (occasionally supplied with the bathtub).
Fit the plug-hole electrical outlet by smearing mastic filler round the sink outlet opening, and after that pass the electrical outlet with the hole in the bath. Use the nut provided by the supplier to fit the plug-hole. Check out the plug-hole outlet for an inlet on the side for the overflow pipe.
Next off, fit completion of the versatile overflow pipe to the overflow electrical outlet. Afterwards, screw the pipeline to the overflow face which ought to be fitted inside the bathroom. Make sure you use all of the supplied washers.
Connect the trap to the base of the waste outlet on the bath tub by winding the string of the waste outlet with silicone mastic or PTFE tape, and also screw on the trap to the outlet. Attach the bottom of the overflow tube in a similar fashion.
The bathroom needs to currently prepare to be fitted in its last setting.
Removing Old Taps
If you require to replace old taps with new ones as a component of your setup, then the initial thing you need to do is separate the supply of water. After doing so, activate the taps to drain pipes any type of water remaining in the system. The process of removing the existing faucets can be rather problematic as a result of the restricted access that is usually the situation.
Make use of a basin wrench (crowsfoot spanner) or a faucet tool to reverse the nut that attaches the supply pipelines to the faucets. Have a towel ready for the remaining water that will originate from the pipes. As soon as the supply pipelines have been eliminated, utilize the same device to loosen up the nut that holds the taps onto the bath/basin. You will require to quit the single faucets from turning throughout this procedure. As soon as the taps have been removed, the holes in the bath/basin will need to be cleansed of any type of old sealing compound.
Before carrying on to fit the new faucets, compare the pipeline links on the old faucets to the brand-new taps. If the old faucets are longer than the brand-new taps, then a shank adapter is required for the new faucets to fit.
Installing the Bath tub
Using both wood boards under its feet, position the tub in the needed placement. The wooden boards are handy in equally spreading out the weight of the bath tub over the location of the boards as opposed to focusing all the weight onto four small factors.
The following objective is to ensure that the bath tub is leveled all round. This can be accomplished by checking the spirit level and changing the feet on the tub until the level reviews level.
To mount taps, fit all-time low of the furthest adaptable tap port to the appropriate supply pipe by making a compression join; after that do the same for the various other tap.
Turn on the water system and also examine all joints and also new pipework for leaks and also tighten them if required. Load the tub and also examine the overflow outlet and the regular outlet for leaks.
Ultimately, take care of the bathroom paneling as explained in the producer's user's manual.
Tiling and securing around the bath tub ought to wait until the tub has been utilized at least once as this will certainly settle it right into its last setting.
Fitting New Touches
If the tails of the brand-new taps are plastic, after that you will certainly need a plastic adapter to stop damage to the thread. One end of the port fits on the plastic tail of the tap and the other end offers a connection to the current supply pipelines.
If you require to fit a monobloc, after that you will require minimizing couplers, which connects the 10mm pipe of the monobloc to the conventional 15mm supply pipeline.
Next off, place the faucet in the placing hole in the bath/basin making sure that the washing machines are in location in between the tap and also the sink. Protect the tap in place with the supplier provided backnut. When the faucet is firmly in position, the supply pipes can be attached to the tails of the taps. The faucets can either be attached by using corrugated copper piping or with typical faucet adapters. The previous kind needs to be attached to the faucet finishes initially, tightening only by hand. The supply pipelines can later be attached to the various other end. Tighten up both ends with a spanner after both ends have actually been connected.
Tiling Around the Bathtub
In the area where the bath meets the tile, it is needed to seal the accompanies a silicone rubber caulking. This is important as the fitting can move sufficient to crack a stiff seal, causing the water to penetrate the wall surface between the bathroom as well as the tiling, leading to complications with wetness and feasible leaks to the ceiling below.
You can choose from a range of coloured sealers to blend in your components as well as installations. They are offered in tubes as well as cartridges, and can securing spaces up to a width of 3mm (1/8 inch). If you have a bigger void to fill, you can load it with spins of soaked newspaper or soft rope. Remember to constantly load the tub with water prior to sealing, to permit the activity experienced when the bathtub remains in usage. The sealant can split relatively very early if you do not consider this motion prior to sealing.
Conversely, ceramic coving or quadrant tiles can be used to edge the bath or shower tray. Plastic strips of coving, which are simple to make use of as well as reduce to size, are also conveniently available on the market. It is a good idea to fit the tiles making use of water-resistant or water-proof sticky and cement.
